Search This Blog

Showing posts with label Layout. Show all posts

Tuesday, April 8, 2014

Expander Control WPF Example

WPF > Controls > Layout > Expander

Expander displays a header that has a collapsible window that displays content when user clicks arrow button.


Example


XAML


<Window x:Class="ImageManager.MainWindow"
        xmlns="http://schemas.microsoft.com/winfx/2006/xaml/presentation"
        xmlns:x="http://schemas.microsoft.com/winfx/2006/xaml"
        Title="MainWindow" Height="350" Width="525" Loaded="Window_Loaded">
    <Grid>
        <Expander Header="Expander1" HorizontalAlignment="Left" Margin="59,94,0,0" VerticalAlignment="Top">
           <TextBlock Text="Expander 1" />
        </Expander>
        <Expander Header="Expander2" HorizontalAlignment="Left" Margin="59,141,0,0" VerticalAlignment="Top">
            <TextBlock Text="Expander 2" />
        </Expander>
    </Grid>

</Window>

Monday, November 11, 2013

RadioButton WPF Example

WPF > Controls > ContentControl > RadioButton

RadioButton is a button that can be selected by a user and has two states: true or false.
Note: A user can select only one item at a time within a RadioButton group by placing controls inside a parent or by setting GroupName.
XAML

<Window x:Class="WpfApplication1.MainWindow"
        xmlns="http://schemas.microsoft.com/winfx/2006/xaml/presentation"
        xmlns:x="http://schemas.microsoft.com/winfx/2006/xaml"
        Title="MainWindow" Height="350" Width="525" Background="#FFF3EEEE">

    <StackPanel>
        <RadioButton GroupName="grp" Checked="RadioButton_Checked">1</RadioButton>
        <RadioButton GroupName="grp" Checked="RadioButton_Checked">2</RadioButton>
        <RadioButton GroupName="grp" Checked="RadioButton_Checked">3</RadioButton>
        <RadioButton GroupName="grp" Checked="RadioButton_Checked">4</RadioButton>
    </StackPanel>

</Window>

C# Code

private void RadioButton_Checked(object sender, RoutedEventArgs e)
{
   ShowRB(sender);
}
void ShowRB(object sender)
{
   RadioButton li = (sender as RadioButton);
   MessageBox.Show("You clicked " + li.Content.ToString());
}

ToolTip WPF Example

WPF > Controls > ContentControl > ToolTip

Tooltip is a small pop-up window that is displayed when a user move the mouse pointer over an element.
The content of a tooltip can contain text, images, shapes, etc.


Example:

<Window x:Class="WpfApplication1.MainWindow"
        xmlns="http://schemas.microsoft.com/winfx/2006/xaml/presentation"
        xmlns:x="http://schemas.microsoft.com/winfx/2006/xaml"
        Title="MainWindow" Height="350" Width="525" Background="#FFF3EEEE">

  <TextBox HorizontalAlignment="Left" Height="29" VerticalAlignment="Top">TextBox with ToolTip
        <TextBox.ToolTip>
            <ToolTip>
                <DockPanel >
                    <TextBlock Text="ToolTip Information"/>
                </DockPanel>
            </ToolTip>
        </TextBox.ToolTip>
    </TextBox>
</Window>


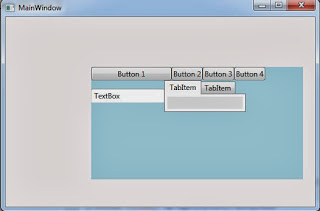
WPF WrapPanel Example

WPF > Controls > Layout > WrapPanel

WrapPanel arranges child elements in sequential position from left to right and breaking content to the next line.

Example:
XAML

<Window x:Class="WpfApplication1.MainWindow"
        xmlns="http://schemas.microsoft.com/winfx/2006/xaml/presentation"
        xmlns:x="http://schemas.microsoft.com/winfx/2006/xaml"
        Title="MainWindow" Height="350" Width="525" Background="#FFF3EEEE">

        <WrapPanel Background="LightBlue" Margin="141,82,20,45">
            <Button Width="132">Button 1</Button>
            <Button>Button 2</Button>
            <Button>Button 3</Button>
            <Button>Button 4</Button>
            <TextBox Height="23" TextWrapping="Wrap" Text="TextBox" Width="120"/>
            <TabControl Height="52" Width="134">
                <TabItem Header="TabItem">
                    <Grid Background="#FFE5E5E5"/>
                </TabItem>
                <TabItem Header="TabItem">
                    <Grid Background="#FFE5E5E5"/>
                </TabItem>
            </TabControl>
        </WrapPanel>
</Window>

DockPanel Example WPF

WPF > Controls > Layout > DockPanel

With DockPanel you can arrange child elements either horizontally or vertically, relative to each other.
Note: LastChildFill property:  the last child element of a DockPanel always fills the remaining space!

Example:

XAML:

<Window x:Class="WpfApplication1.MainWindow"
        xmlns="http://schemas.microsoft.com/winfx/2006/xaml/presentation"
        xmlns:x="http://schemas.microsoft.com/winfx/2006/xaml"
        Title="MainWindow" Height="350" Width="525" Background="#FFF3EEEE">

    <DockPanel LastChildFill="True" >
        <Border Height="25"  BorderBrush="Black" BorderThickness="1" DockPanel.Dock="Top">
            <TextBlock Foreground="Black">Top</TextBlock>
        </Border>
        <Border Height="25"  BorderBrush="Black" BorderThickness="1" DockPanel.Dock="Bottom">
            <TextBlock Foreground="Black">Bottom</TextBlock>
        </Border>
        <Border Width="60"   BorderBrush="Black" BorderThickness="1" DockPanel.Dock="Left">
            <TextBlock Foreground="Black">Left</TextBlock>
        </Border>
        <Border  BorderBrush="Black" BorderThickness="1">
            <TextBlock Foreground="Black">Content (remaining space)</TextBlock>
        </Border>
    </DockPanel>

</Window>


Canvas WPF Example

WPF > Controls > Layout > Canvas

Canvas is an area within you can set position of child elements by using coordinates that are relative to the Canvas area.
Canvas is the only panel element that has no inherent layout characteristics.
Note: Vertical alignment and horizontal alignment have no effect inside a Canvas.

Example:

<Window x:Class="WpfApplication1.MainWindow"
        xmlns="http://schemas.microsoft.com/winfx/2006/xaml/presentation"
        xmlns:x="http://schemas.microsoft.com/winfx/2006/xaml"
        Title="MainWindow" Height="350" Width="525">

    <Canvas Height="400" Width="400">
        <Canvas Height="153" Width="154" Top="0" Left="0" Background="Red">
            <Ellipse Fill="#FFF4F4F5" Height="56" Stroke="Black" Width="154"/>
            <Rectangle Width="40" Height="50" RenderTransformOrigin="1.9,1.12" Canvas.Left="71" Canvas.Top="26" >
                <Rectangle.Fill>
                    <LinearGradientBrush EndPoint="0.5,1" StartPoint="0.5,0">
                        <GradientStop Color="Black" Offset="0"/>
                        <GradientStop Color="#FF7C1C1C" Offset="1"/>
                    </LinearGradientBrush>
                </Rectangle.Fill>
            </Rectangle>
        </Canvas>
    </Canvas>
</Window>